Checkpoint 0: A Database Hello World
- Overview: Answer Select/Project Queries
- Deadline: Feb 10
- Grade: 5% of Overall Grade
This project aims to get you familiarized with the course submission system, force you to set up your build and testing environment, and to introduce you to the basics of JSqlParser.
Meet The Submission System
Let's first get familiar with the submission system. It's located at: http://dubstep.odin.cse.buffalo.edu
After loading up the website, you will need to create an account.
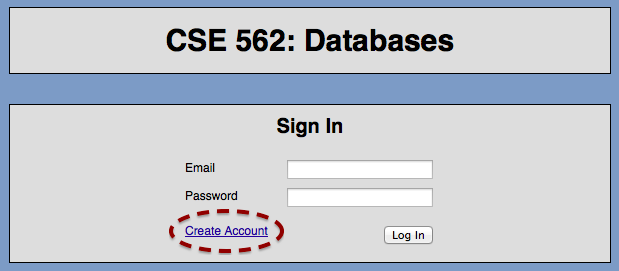
When creating an account, be sure to use your UB email address. If you don't have a UB email address, contact the teacher or a TA as soon as possible.

After you create an account, you'll receive an email with an activation token. Click on the link in the email, or copy it into your browser's location bar.
Forming Groups
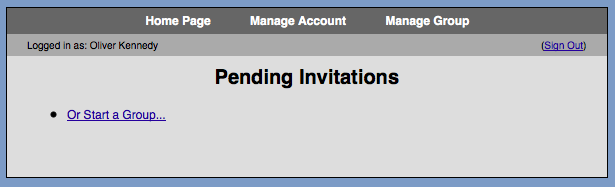
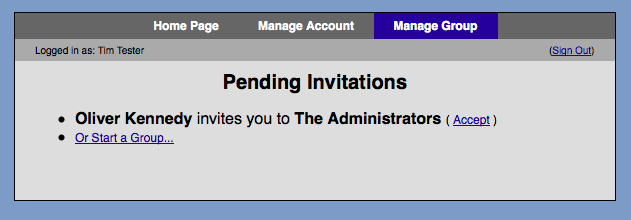
Find up to three other students in the class, and elect one member of your group to be the leader. You'll also need a group name. Be creative. This is how you'll show up on the leaderboards. The group leader should go to the Manage Group tab and click "Or Start a Group..."
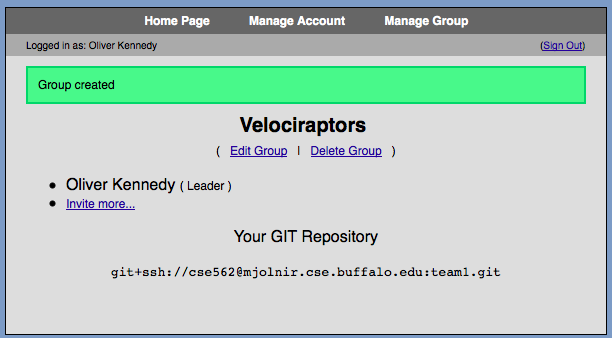
After creating and naming your group, your leader should click "Invite more..." on the Manage Group tab and add all remaining group members by their email addresses.
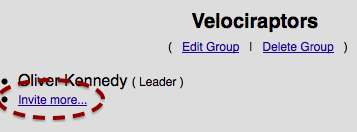
All team members should now be able to accept their invitation by logging in and going to their Manage Group tab.
GIT and Source Code Management
For submissions, and for your group's convenience, DµBStep provides your group with a GIT repository. If you don't know how to use GIT, it's an important skill to have. Numerous tutorials and reference materials are available, including:
If you don't want to dive headfirst into GIT, a nice user-friendly front-end is SourceTree http://www.sourcetreeapp.com. Alternatively, read on below for a quick and dirty intro to the three GIT commands you can't live without.
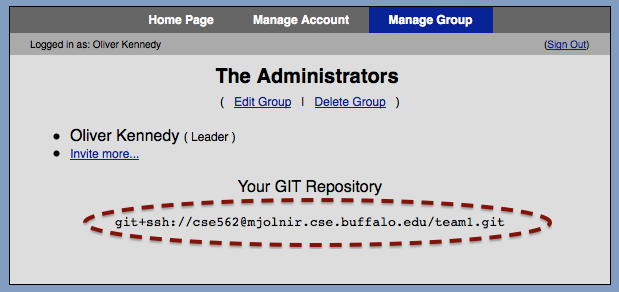
The upstream URL of your team's GIT repository is available from the Manage Group tab.
To access the repository, you'll first need to register your GIT public key. An overview of public key management can be found here. A public key should look something like this (with no line breaks):
ssh-rsa AAAAB3NzaC1yc2EAAAADAQABAAABAQDgX8jMmapRQ7pIJ0JV9zfvkqef/OBV//y3t0ceV5KaZ4DMlcn+xzonR/OR4cTuAyQRyQK3TlamleUATQe9JAieaI3dodnCfrN7C16RiqkB6iQorpCC+LdkdM7n3rVtleIAY93Imoq6tJEf+boeLz7EtB6I7OJSZ+NgRv5Z4vvF2hlgJrXaCr+ofURm/lLOHB1AdcZiXVL8tPOVl/FG170/i1fI+Y1eyQtko10XlHTHx4bGavYMsOKWoVjTBCruH8/VmiaUY7RBTn8Qg+yOQZPIOTrtWxRm0/Q373hKn8Xt+Dh38tHL3Z8X2C4jup/JFRmoT+nH6m9pB79IcnBNYa7V okennedy@sif
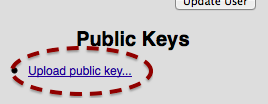
Uploading Your Public Key
From the Manage Account tab, click on "Upload public key..."
Copy the entire public key into the field provided and add a short description (useful if you work on multiple computers).

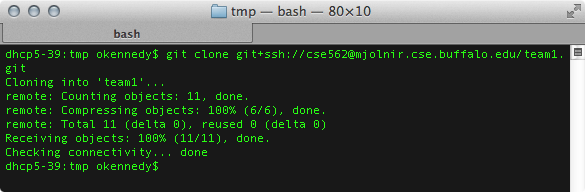
You should now be able to clone your team's GIT repository:
A Quick and Dirty Intro to GIT
Once you have cloned a copy your repository (a directory called teamX, where X is your group ID), you'll need some organization. The grading script will attempt to compile all of the java files in your repository, but for your own sanity and ease of compilation it can be helpful to keep your repository organized. It's common to create a directory named `src` at the root of your git repository. Create that now.
> cd teamX
> mkdir src
> mkdir src/dubstep
> touch src/dubstep/Main.java
Now you need to make git aware of the file you just added.
> git add src/dubstep/Main.java
Next, you need to create a commit checkpoint -- a marker indicating that your local copy of the repository is in a stable state.
> git commit -a
The -a flag commits all files that have changed (you still need to manually add files that are new). You will be asked to provide a message that describes the changes that you've just made to the code. Finally, you need to send the changes to the central repository.
> git push
The files are now in your global repository. Your teammates can now receive your changes by pulling them from the central repository.
> git pull
If this works, you should be all set.
Submitting Code
To have your project graded, go to the Home Page tab, click "Show" for the project you want to submit, and click "Create new submission".
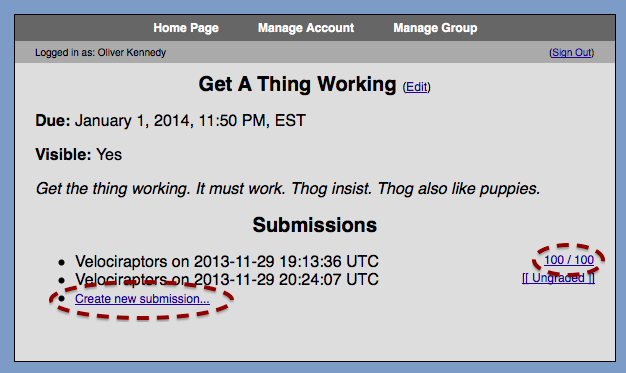
A snapshot of your repository will be taken, and your entire group will receive an email notification once your project has been graded. You may only have one submission pending at any given time, but you may resubmit as many times as you like.
Grading Workflow
The grading scripts will do the following:- Retrieve your repository from GIT.
- Recursively scan through the directory src/ at the root level of your submission for *.java files.
- Compile all of these files (with all course-provided classes in the classpath). Compilation is performed using the Java 1.8 SDK. Do not use features from later versions of java or your submission will not compile!
- Attempt to run your project as
java -cp {classpath} dubstep.Main {arguments} - Validate the output.
Hello World!
Now that you're familiar with the submission system, you'll need to submit a simple test case to get yourselves familiar with JSQLParser. You'll need to be able to run the simplest possible SQL query:
SELECT * FROM <tablename>;Let's start with the JavaDoc: http://doc.odin.cse.buffalo.edu/jsqlparser/
The first class to look at is CCJSQLParser. This class converts any SQL string into what's called an Abstract Syntax Tree or AST. An AST is a tree of objects representing the different parts of a query. There are a few different types of AST objects, or nodes. For example, Statements represent raw SQL queries. If you look closely, you'll see a Statement interface that quite a few classes inherit from: Select, Update, Insert, Delete and so forth.
Try out the following example:
  StringReader input = new StringReader("SELECT * FROM R")
  JSqlParser parser = new JSqlParser(input)

  Statement query = parser.Statement()
A Statement alone isn't all that helpful. You need to find out what type it is in order to access the goodies inside. If you look at the Statement Javadoc you'll see a list of all known implementing subclasses. You can use Java's instanceof operator to check which type you just got. The one we'll be working with today is Select, so you'd do something like this:
  if(query instanceof Select){
    Select select = (Select)

    /** Do something with the select operator **/
  } else {
    throw new java.sql.SqlException("I can't understand "+query);
  }
You'll see this pattern of instanceof followed by a cast repeated a bunch of times throughout the course projects.
If you look at the javadoc for Select, you'll see that it doesn't have a lot of methods. This is because Selects can appear in a lot of different contexts: Within UNIONs, as part of a query (e.g., SELECT (SELECT FOO FROM BAR) FROM BAZ), or nested in a FROM clause. The Select object itself stores information that's only relevant to SELECT statements.
To get at the chewy center of the Select, we'll need to go one level deeper into the SelectBody. These can be one of two things:
SELECT ... FROM ... WHERE ...represented as a PlainSelect. Or, it can be:
SELECT ... FROM ... WHERE ... UNION SELECT ... FROM ... WHERE ... UNION ...represented as a Union, which is essentially a list of PlainSelects.
For this assignment, you can assume that you're getting just a PlainSelect and cast it as above (but be sure to check its type first). As you'll see in the JavaDoc, PlainSelect has a ton of methods. Don't be overwhelmed. Each method matches exactly one field of a SELECT statement.
For the purposes of this assignment, ignore everything in PlainSelect except: getFromItem(). Here, you'll need to go through one more level of unwrapping. As you'll see in the JavaDoc, a FromItem can be a Table, a nested query (i.e., SubSelect) or a JOIN ... ON expression (i.e., SubJoin). Today, we'll be working only with Tables.
Once you have a Table object, you can get the name of the table being referenced.
String tableName = Table.getName() /* Should be "R" in the example of "SELECT * FROM R" */You'll find a file named data/<tableName>.csv (replacing <tableName> with the table name you get from the query).
Your goal for checkpoint 0 is to read a SQL query from standard in (System.in), identify the table being referenced in the FROM clause of the query, and print the corresponding csv file to standard out (System.out).